
We will need to stop Cacti at the old server during the migration process. To minimize any gaps in graphs, we will prepare the newer server first (while Cacti at the old server is still running).
We will start the process by installing Cacti in the new server. To recap, we can use apt-get to install Cacti and set up necessary MySQL databases.
After the installation is finished, we will disable the cron job for Cacti poller in both servers. This will ensure that neither of the servers will poll or populate any more graphs. That is, the graphs will remain unchanged during the migration window. We will enable the cron job once the graphs have been migrated.
# pico /etc/cron.d/cacti
## Comment out the cacti poller cron job ##

# */5 * * * * www-data php --define suhosin.memory_limit=512M /usr/share/cacti/site/poller.php 2>&1 >/dev/null | if [ -f /usr/bin/ts ] ; then ts ; else tee ; fi >> /var/log/cacti/poller-error.log
In the next step, we will create a database dump from the MySQL server running on the old Cacti server. Once the database dump is ready, we will copy that dump file to the new server and update records in the Cacti database.
Step 3.1: Old Server
To create a database dump, we will use the following command. Type in the MySQL root password when prompted.
# mysqldump -u root -p cacti > cactidump.sql
The above command will create a MySQL dump file named cactidump.sql, which contains all data from the database 'cacti'.
Next, we will transfer the dump file to the server.
# scp cactidump.sql root@NewServerIP:/root
You should use the IP address of your new server and the user that is relevant to your setup. I am using root as an example.
Step 3.2: New Server
After the dump file has been migrated, we will use mysqldump again to populate the database 'cacti' with data from the old server.
# mysqldump -u root -p cacti < /root/cactidump.sql
Optional: You can easily verify whether the database has been populated by examining the database as follows.
# mysql -u root –p
mysql> use cacti;
Database changed
mysql> select description from host;
+-------------+
| description |
+-------------+
| Server-2    |
| Server-1    |
+-------------+
2 rows in set (0.00 sec)
mysql> exit;
Unfortunately, Cacti cannot update the graphs if the RRD files are copied directly to the new server. The right way to migrate the graphs is to convert them to XML, move them to the new server and restore the RRD files from XML.
Step 4.1: Old Server
On the old server, convert RRD files into XML files as follows.
Create a directory to store the XML files.
# mkdir /tmp/xml
# cd /var/lib/cacti/rra
Convert the RRD files to XML files.
# for i in `find -name "*.rrd"`; do rrdtool dump $i > /tmp/xml/$i.xml; done
Create a tar file.
# cd /tmp/xml
# tar cvfz cacti.tar.gz *
Copy the tar file to the new server.
# scp cacti.tar.gz root@NewServerIP:/root
Step 4.2: New Server
On the new server, we will copy the tar file to the right directory and extract the contents. After extraction, we will restore the RRD files from the XML ones.
Copy and extract the files to the right directory.
# cp /root/cacti.tar.gz /var/lib/cacti/rra
# cd
/var/lib/cacti/rra
# tar zxvf cacti.tar.gz
Restore the RRD files from the XML files.
# for i in `find -name "*.xml"`; do rrdtool restore $i `echo $i |sed s/.xml//g`; done
Now that we have the RRD files needed by Cacti, we can go ahead and delete the tar file and the XML files.
We are almost done with the migration. At the new server, we need to make sure that the Cacti poller can read/write the RRD files. To do that, first we will check the ownership details for the RRD files.
On the old server:
# ls -l /var/lib/cacti/rra/
-rw-rw-r-- 1 www-data www-data  94816 Dec 14 13:50 server-1_traffic_in_8.rrd
-rw-rw-r-- 1 www-data www-data  94816 May  7 02:10 server-1_traffic_in_9.rrd
-rw-rw-r-- 1 www-data www-data  94816 May  7 02:10 server-2_traffic_in_10.rrd
On the new server:
# chown www-data:www-data /var/lib/cacti/rra/*.rrd
Now the Cacti poller in the new server has read/write permissions to the RRD files.
In step 1, we has disabled the Cacti poller in both servers. As the migration is completed, we will enable the poller in the new server.
# vim /etc/cron.d/cacti
## Uncomment the cacti poller cron job ##

*/5 * * * * www-data php --define suhosin.memory_limit=512M /usr/share/cacti/site/poller.php 2>&1 >/dev/null | if [ -f /usr/bin/ts ] ; then ts ; else tee ; fi >> /var/log/cacti/poller-error.log
Now the cron daemon should invoke the Cacti poller script every 5 minutes, and Cacti graphs should start updating within maximum 15 minutes.
If you want to hold on to the old server for the time being, you could enable the poller in the old server too. If enabled, both servers should keep polling and populating the graphs, which should be identical.
Now that the migration is completed, you can access Cacti by going to http://NewServerIP/cacti on your web browser.
Username: admin
Password: same as the old server
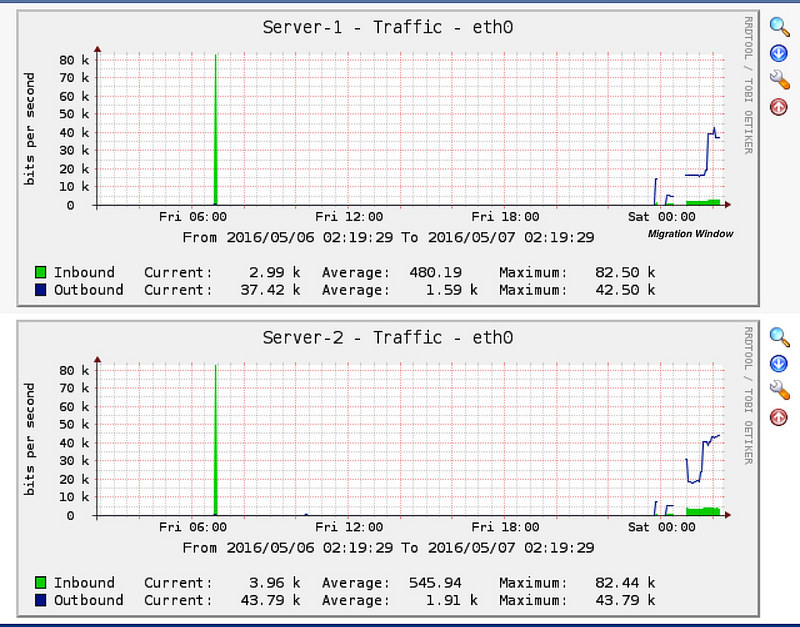
Here I am adding some screenshots from both servers below.
Figure 1: Old Server Graphs
Figure 2: New Server Graphs
In most cases Cacti migration should be done smoothly. In case you run into any issues, you can check the following.
First, remember that patience is the key. I have seen Cacti graphs taking over 15 minutes to start populating. Don't start troubleshooting too soon.
Check if the cron daemon is running. Without cron daemon, graphs will not be updated.
Check if the RRD files are writable by Cacti.
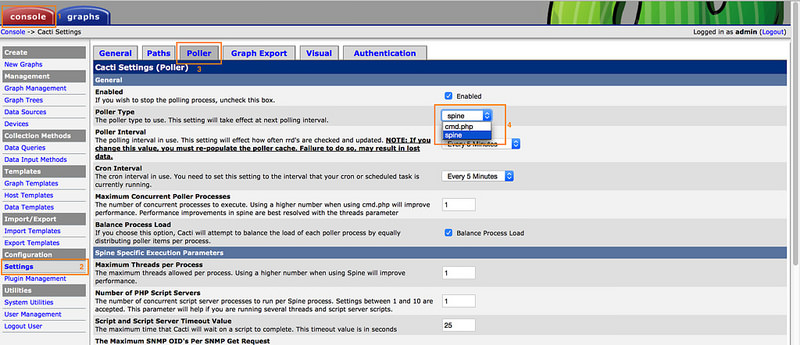
Verify that both servers are using the same poller. For example, if the old server was using cacti-spine as the poller, the new server should do the same. This setting can be viewed under Console > Settings > Poller > Poller Type.
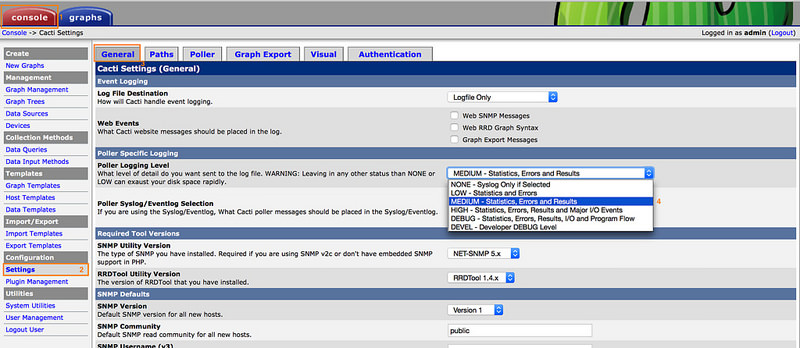
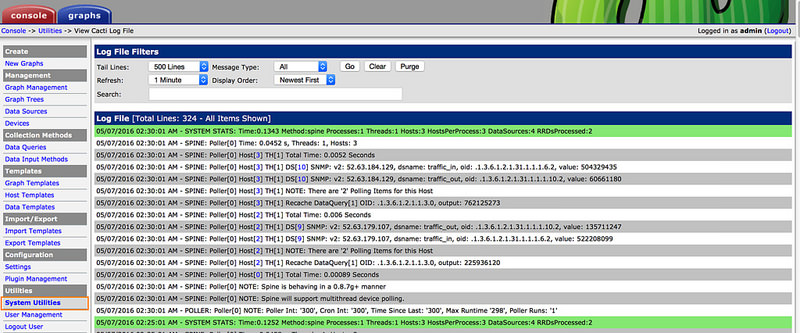
Finally, the Cacti log file is always a useful source of information for troubleshooting. To make Cacti logs updated with relevant data, change the logging level to at least 'Medium'. This can be changed under Console > Settings > General > Poller Logging Level.
The logs can be viewed at Console > System Utilities > View Cacti Log File.
To sum up, we can easily migrate Cacti graphs from one server to another. The graphs are generated based on the data contained in the RRD files. Other data like hosts, graph trees, RRDs associated with the graphs are all stored in MySQL database. Thus migrating MySQL database along with RRD files should do the trick.